7 September 2026
5 Minute Routine Prevents Cymbal Cracks for Drummers
5 Minute Routine Prevents Cymbal Cracks for Drummers
Cymbals crack because repeated impact concentrates stress in one small spot instead of spreading across the bronze, usually thanks to a stand that won’t let the cymbal move, missing felts, or a stick coming straight down at 90 degrees. The single biggest fix costs nothing: let the cymbal rock freely on its stand with the wing nut snug, not clamped, and hit it with a glancing stroke instead of a direct smash.
TL;DR:
- Most cymbal cracks originate from hardware issues, especially over-tightened wing nuts and missing felts that prevent proper movement.
- Playing impact angle significantly affects lifespan, with perpendicular hits causing more stress and sweeping strokes reducing crack risk.
- Thinner cymbals are more prone to cracking under aggressive styles, and inconsistent matching of cymbal strength to playing intensity accelerates damage.
- Transport mishaps, like stacking without dividers and exposure to extreme temperatures, cause unseen fractures that develop over time.
- Regular inspection and proper hardware, including sleeves, felts, and matching cymbal weights, are essential for preventing cracks and extending cymbal life.
Table of Contents
- What Causes Cymbal Cracks: The Mechanical Culprits
- How Your Playing Technique Creates Cracks
- Does Cymbal Type and Thickness Affect Crack Risk?
- Transport and Storage Damage You Can’t See Coming
- Where Cracks Start: Edge, Bell, and Bow Explained
- What To Do When Your Cymbal Cracks
- Cymbal Maintenance Checklist to Prevent Cracks
- Getting the Hardware Right: What Temple of Sound Recommends
- A Realistic View on Repair, Replacement, and Cymbal Aging
- How Temple of Sound Helps You Stop Cracks Before They Start
- Sources
What Causes Cymbal Cracks: The Mechanical Culprits
Most cracks trace back to hardware, not bad luck. A cymbal is designed to flex and vibrate freely on its stand. Anything that restricts that movement forces the shock of every strike into one concentrated point instead of letting it ripple outward across the bow.
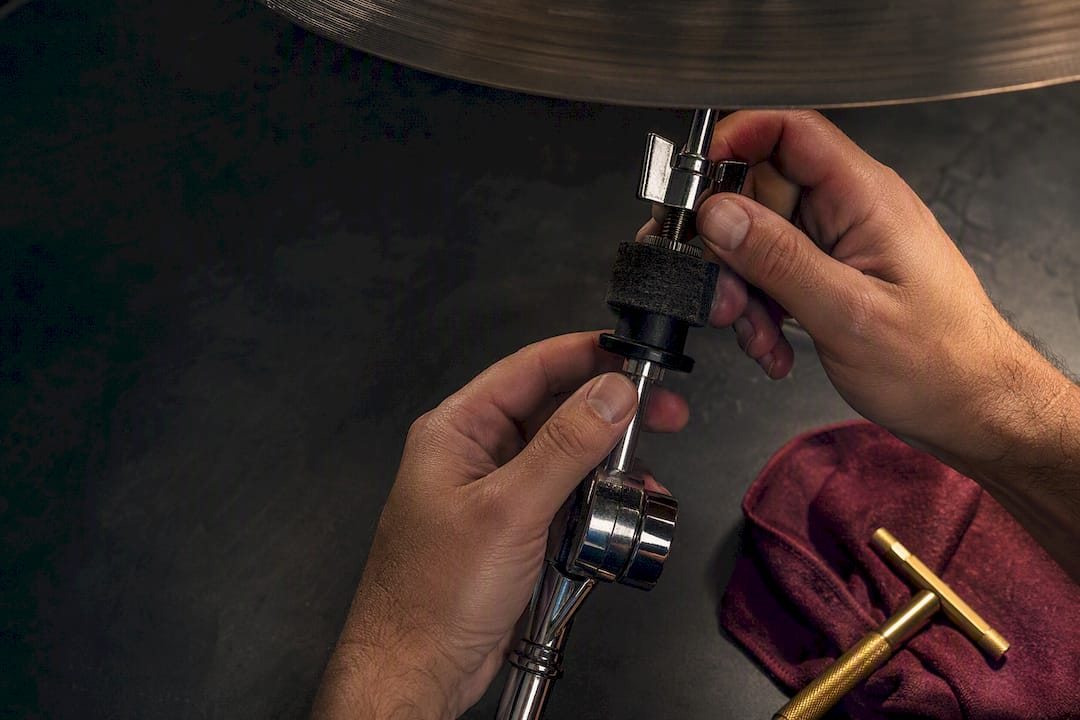
The classic offender is an over-tightened wing nut. Clamp a cymbal down tight against the stand and it can no longer rock with the impact, so the metal around the bell absorbs stress it was never built to handle alone. Sweetwater’s cymbal care guidance points to this exact scenario, paired with crushed or missing felts, as a leading mechanical cause of spiderweb cracking and bell-area fractures.
The plastic sleeve matters just as much. That thin tube around the cymbal stand’s post exists for one reason: to stop bronze from ever touching metal. Lose the sleeve, or let it crack and wear thin, and the cymbal’s mounting hole starts grinding directly against the stand rod every time you play. Over months, that friction wears the hole into an oval shape. Drummers call this “keyholing,” and it’s one of the most common failure points on cymbals that otherwise look fine.
Run through this check before your next session:
- Confirm the plastic sleeve is present, intact, and centered in the mounting hole.
- Check that felts sit both above and below the cymbal, not just underneath.
- Loosen the wing nut until the cymbal wiggles slightly. It should never sit rigid.
- Look at the mounting hole itself. An oval shape instead of round means keyholing has already started.
- Replace any felt that’s compressed flat or torn.
BYU’s percussion techniques program frames the goal simply: avoid cracks and keyholing by using proper sleeves and felts, and mounting the cymbal so the stick strikes roughly parallel to its surface rather than straight into it.
Pro Tip: Carry a spare set of felts and a plastic sleeve in your stick bag. They weigh nothing, cost almost nothing, and a worn sleeve you catch in soundcheck is a crack you never have to explain to your wallet.
How Your Playing Technique Creates Cracks
Two drummers can own the identical cymbal, play it the same number of hours, and get completely different lifespans out of it. The difference almost always comes down to strike angle.
Hit a cymbal at a full 90 degrees, stick coming straight down like a hammer on a nail, and the bronze has nowhere to send that energy except straight through itself. Compare that to a glancing, sweeping stroke that grazes across the surface at an angle. The second motion lets the cymbal absorb the hit as vibration and lets it flex the way it was designed to. Rech Cymbals recommends angling cymbals toward the player and using sweeping strokes specifically to avoid that direct, perpendicular impact.
Repetitive-strike fatigue makes this worse over time. Bronze is a metal, and like any metal subjected to the same stress point thousands of times, it develops microscopic fatigue lines long before you ever see a visible crack. Drummers who hit the same 2 inch patch on a crash every song, every night, for years are the ones who eventually watch a hairline fracture appear right where their stick always lands.
Three adjustments retrain that habit fast:
- Rotate your strike zone. Move your hit point by half an inch every few songs instead of returning to the exact same spot.
- Practice the “scoop.” Instead of dropping the stick tip down, sweep it across the edge of the cymbal in a shallow arc, like skipping a stone.
- Control your rebound. Let the stick bounce off the cymbal rather than driving through it. If your arm keeps pushing after contact, you’re forcing energy into the metal instead of letting the cymbal absorb and release it.
Some cymbal makers treat these drills as the most effective prevention a player controls directly, more so than any hardware fix, because technique determines where and how hard every single strike lands.
Pro Tip: Record yourself from the side during a rehearsal. Most drummers are shocked to see how vertical their crash hits actually are compared to how angled they think they are.
Does Cymbal Type and Thickness Affect Crack Risk?
Yes, and mismatching cymbal weight to your playing style is one of the most avoidable causes on this list. A paper-thin crash designed for jazz brushwork will crack fast under the arm of a metal drummer swinging for maximum volume. That’s not a manufacturing defect. It’s a mismatch between the cymbal’s design and the force it’s being asked to survive.
Thinner cymbals flex more, which is exactly why they sound bright, fast, and explosive. That same flexibility means less bronze mass to absorb hard impact, so aggressive players wear them out faster. Heavier rides and crashes distribute force across more material and hold up better to sustained, hard playing, though they respond slower and sound darker. Rech Cymbals specifically advises matching cymbal weight to your music style as a core prevention step, not an afterthought.
Alloy composition and how a cymbal is lathed or hammered also shift durability. Heavily lathed cymbals remove more surface material, which brightens tone but thins the metal in places. Effects cymbals with holes drilled through them, trash crashes, or cymbals with cutout patterns, look striking and sound unique, but every cutout edge acts as a stress riser where cracks initiate more easily than on a solid, unbroken surface.
A few practical pairings to keep in mind:
- Loud rock and metal playing favor medium to heavy crashes and rides with fuller bronze content.
- Lighter jazz, acoustic, or worship settings suit thinner, more responsive cymbals without the durability penalty, since the playing force stays lower.
- Effects and cutout cymbals deserve softer, more controlled strokes regardless of genre.
If you’re unsure which profile fits your playing, comparing crash and ride characteristics side by side makes the tradeoffs clearer before you buy.
Transport and Storage Damage You Can’t See Coming
Not every crack starts on stage. A surprising number begins in the trunk of a car or the bottom of a gig bag, and they don’t show up until weeks later when you’re mid song and hear that telltale crack sound for the first time.
Stacking cymbals directly on top of each other without dividers is the most common offender. Bronze edges rubbing against bronze edges during a bumpy drive creates hairline fractures invisible to the eye. Those fractures sit dormant, then blossom into visible cracks once normal playing stress hits that weakened spot. Discussion among drummers on DrumForum repeatedly points to exactly this pattern: transport damage that only reveals itself once the cymbal goes back into rotation.
Simple habits prevent most of this:
- Use a hard case or a padded cymbal bag with individual dividers between each cymbal.
- Never let cymbals ride loose in a trunk or van where they can slide and collide.
- Avoid extreme temperature swings, like leaving cymbals in a hot car, which can stress metal over time.
- Do a quick visual and tap-test inspection before and after every gig, running a finger along the edge and bow to feel for anything that wasn’t there last time.
Sweetwater’s maintenance guidance backs this up directly, noting that hairline fractures from transport often only become obvious after repeated stress reveals them on stage.
Where Cracks Start: Edge, Bell, and Bow Explained
Reading a crack tells you almost exactly what caused it, which matters when you’re deciding whether it’s a technique problem, a hardware problem, or just bad luck.
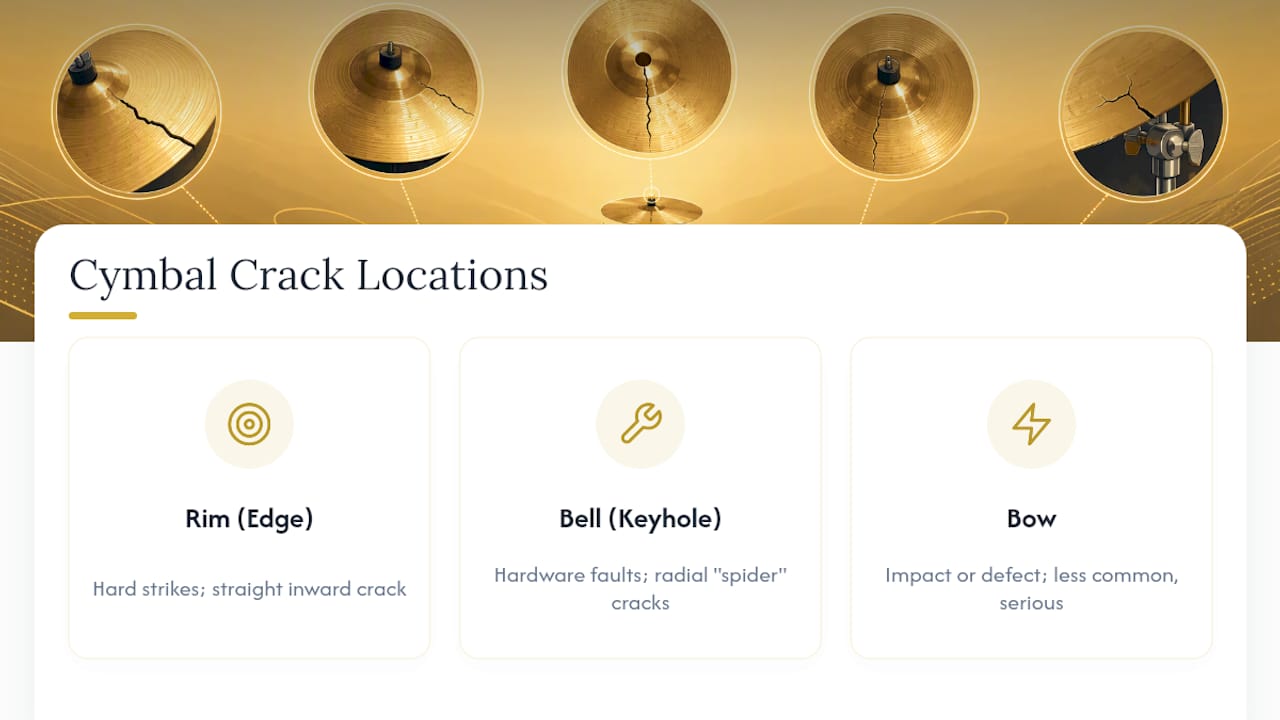
Edge and rim cracks run inward from the outer lip of the cymbal, usually as a single straight line. Drumming Base notes that cracks commonly begin at the rim and move inward if left unaddressed, and this pattern points almost always to technique: hard, direct strikes at the crash point.
Bell and keyhole cracks cluster around the mounting hole, often radiating outward in a pattern drummers nickname “spider webbing.” This one points straight back to hardware. An over-tightened wing nut, a missing sleeve, or grinding from transport are the usual suspects.
Bow cracks, appearing across the flatter middle section of the cymbal, are less common and often more serious. These sometimes trace back to a severe drop or impact, though occasionally a manufacturing flaw localizes stress in a spot that later fails under normal play.
None of these are just cosmetic. A crack, wherever it sits, changes how the cymbal vibrates and almost always dulls the tone before it becomes a safety issue. A rim crack that keeps spreading can eventually shed a sharp piece of metal mid-performance, which is reason enough to address it the moment you spot one rather than waiting to see how far it travels.
What To Do When Your Cymbal Cracks
The moment you spot a crack, your first job is stopping it from growing, not fixing the tone. Cracks propagate under continued stress, so the smart move is buying time while you figure out your next step.
- Stop hitting that exact spot. Redirect your strikes elsewhere on the cymbal immediately, especially away from any edge crack.
- Check and correct the hardware. If it’s a bell crack, inspect the sleeve and felts first. A worn sleeve replaced early can stop a keyhole crack from spreading further.
- Consider stop-drilling. A technician drills a small hole at the very tip of the crack to disperse stress and halt its progress. This is a stopgap, not a cure, and it changes the cymbal’s resonance slightly.
- Look at conversion cutting. Some players have a badly cracked crash professionally cut down into a smaller, trashier-sounding cymbal, essentially embracing the damage as a new voice rather than fighting it.
- Replace when the crack threatens structural safety. A crack that’s traveled more than an inch or two, or one running through the bow rather than just the edge, usually means retirement is safer and more musical than continued patchwork.
Professional repair can extend a cymbal’s working life, but it’s worth setting expectations honestly: stop-drilling and welding rarely restore original tone completely, and a repaired cymbal will almost always sound slightly different than it did before the crack.
Pro Tip: Keep a “beater” cymbal in rotation once a crack appears. A cracked crash still works fine for rehearsals or low-stakes gigs even after it’s retired from your main kit.
Cymbal Maintenance Checklist to Prevent Cracks
Consistency beats intensity here. A five-minute check before every practice does more for cymbal lifespan than an occasional deep clean.
- Before you play: Wipe down each cymbal, handle it by the edges rather than gripping the surface, and glance over the sleeve and felts.
- Weekly: Inspect felts for flattening, confirm the wing nut isn’t over-tightened, and run a finger along the edge feeling for the start of a fracture.
- Monthly: Check the mounting hole for any sign of oval keyholing and replace worn sleeves before they fail completely.
- Cleaning: A soft cloth and mild cleaner keep the finish intact; manufacturer guidance from Ashmore Cymbals warns that abrasive household cleaners can strip protective coatings, so skip anything harsh. Many players also choose to leave natural patina alone rather than polishing it off, since some cymbal finishes are designed to age.
| Frequency | Action | What to check |
|---|---|---|
| Every session | Wipe down, handle by edges | Sleeve position, wing nut tension |
| Weekly | Felt and hardware check | Compressed felts, loose or missing sleeve |
| Monthly | Mounting hole inspection | Oval wear (keyholing), micro-fractures |
| As needed | Cleaning | Mild cleaner only, avoid abrasives |
For a deeper walkthrough of cleaning products and technique, Temple of Sound’s cymbal care guide covers the specifics.
Getting the Hardware Right: What Temple of Sound Recommends
Some cymbal distributors build their guidance around the same principle every repair tech will tell you: hardware failures cause more cracks than bad luck ever does. Sleeves, felts, and the right cymbal weight for your playing style are the cheapest insurance you can buy.
When you’re auditing your own kit, focus on three categories: replacement plastic sleeves and felts for aging stands, padded hard cases for transport, and cymbal weights matched to your genre rather than whatever came in a starter pack. If you’re unsure which pack suits your playing, our cymbal pack guide breaks down the tradeoffs, and our team is glad to talk through kit recommendations directly.
A Realistic View on Repair, Replacement, and Cymbal Aging
Cymbals age. Every one of them, no matter how it’s mounted or played, eventually shows wear. What surprises a lot of drummers is how much of that timeline is actually within their control. Two identical cymbals, same batch, same finish, can have wildly different lifespans depending entirely on mounting hardware and strike habits.
My advice: repair for tone when a crack is small, contained, and the cymbal still means something to your sound. Replace when structural integrity is in question, especially with bow cracks or anything approaching the bell. Don’t let sentiment override safety, but don’t panic and retire a cymbal over a hairline edge crack either.
— Will
How Temple of Sound Helps You Stop Cracks Before They Start
Every fix in this guide points back to the same short list: the right sleeve, the right felts, a case that actually protects your cymbals in transit, and cymbal weights that match how hard you actually play. As the UK’s exclusive distributor for Alchemist Cymbals and the London Drumstick Co., Temple of Sound stocks exactly those replacement parts and curated cymbal packs, so you’re not hunting through generic hardware bins hoping something fits your stand.

If your current setup is missing a sleeve, running on flattened felts, or you’re simply not sure whether your cymbals match your playing style, browse the full range at Temple of Sound and get the hardware sorted before your next crack turns into a full replacement. For cleaning technique alongside the hardware fix, our cymbal care and cleaning guide rounds out the routine. Reach out to a knowledgeable team directly if you want a second opinion on what your kit actually needs.
Sources
- Cymbals Maintenance - BYU Percussion Techniques
- Cymbal Care & Maintenance Guide - Sweetwater
- How To Stop Cracking Your Cymbals | Rech Cymbals
- Cymbal Cracking: Why Does it Happen and How to Prevent it – Drumming Base